Jan Pichrt

Royal TS & PowerShell: Dynamic Folder Ping Discovery

In this blog post, we’re going to explore a powerful feature of Royal TS – dynamic folders. Dynamic folders in Royal TS allow you to automatically populate connections based on a script. We’ll guide you through a simple yet effective PowerShell script that pings all devices within a specified IP range and returns only the live devices. This script can be used to create a dynamic folder in Royal TS, providing you with an up-to-date view of all active devices in your network. Whether you’re a network administrator or an IT professional, this script will be a valuable addition to your toolkit. Let’s get started!

Royal TS is a comprehensive software solution designed to centralize and simplify remote management. Whether you’re dealing with a handful of devices or managing a large-scale network, Royal TS provides a unified interface for seamless access to your systems. It supports a wide range of protocols, including RDP, VNC, SSH, and many more. One of its standout features is the ability to create dynamic folders using scripts, which automatically populate connections based on your criteria. This makes Royal TS an invaluable tool for IT professionals seeking efficient, organized, and secure remote management.

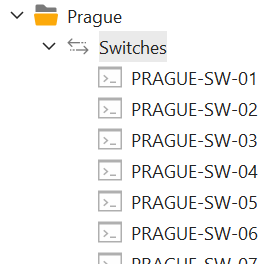
Script bellow will ping devices in specified IP range and create connections in your Royal TS dynamic folder. The result will be similar to what you see in the picture below. The names are generated automatically based on the IP address and prefix defined in the script variables.

Note that the script below is written using the Test-Connection cmdlet and its TimeoutSeconds parameter, which is only available in PowerShell 7.x.!

Update variables or IP definition according to your needs.

# Define variables
$site = 45
$prefix = "PRAGUE-SW-"
$ipStart = 1
$ipEnd = 100

# Create an empty array to store the results
$results = @()

# Loop through the IP range
for ($i = $ipStart; $i -le $ipEnd; $i++) {
    # Construct the IP address
    $ip = "192.168.$site.$i"

    # Ping the IP address
    $ping = Test-Connection -ComputerName $ip -Count 1 -Quiet -TimeoutSeconds 1 -ErrorAction SilentlyContinue

    # Check if the ping was successful
    if ($ping) {
        # Create a new object with the required properties for Royal TS
        $result = New-Object PSObject -Property @{
            Type = 'TerminalConnection'
            Name = $prefix+([string]$i).PadLeft(2,'0')
            ComputerName = $ip
			      CredentialName = 'name_of_your_credentials_stored_in_royalts'
        }

        # Add the result to the array
        $results += $result
    }
}

# Output the results as a single JSON object
$output = New-Object PSObject -Property @{
    Objects = $results
}

# Convert the output to JSON
$output | ConvertTo-Json

Airbus A320 Steering Tiller desktop edition

I built few full scale tillers but they are not very comfortable to use on small desks! So I decided to build another, smaller one! It is working with Microsoft Flight Simulator 2020 (tested) or probably with any other simulator (X-Plane, Prepar3D) on the market because device is recognized as standard gaming device in operating sytem with one axis and two buttons. LEDs are controlled with Arduino code directly.

This one is using double, high quality dust proof potentiometer with center detent so it is reliable and long life. LEDs are designed to indicate which side the tiller is turned to. The colored diodes match the lighting on the plane. Red on the left and green on the right. One button can be used as a pedal disconnect (for flight control check during taxi) and second one can be used as a brake (if you are missing pedals with brakes). 

No screws are needed, the case is snap-on and it is possible to add a balast and non-slip self-adhesive pads for better stability on the table.

The price of all components including PLA material is up to 20 USD.

And even though I have plenty of space on my desk, my favourite tiller to use is this one! 🙂

Why do you need it?

The most noticeable change is that steering with the rudder on the ground will only turn the nose wheel up to 6° which will not be sufficient for normal taxi operations and most turns. Tiller can turn the nose wheel up to 75° in either direction.

Parts needed:
  • Arduino Pro Micro:
    • ATmega32U4, 5V/16MHz
  • Rotary potentiometer with center detent:
    • ALPS RK09L1220 10KBX2CC 0.05 W 10 kΩ
  • Momentary button for 16mm mounting hole
    • R13-507 OFF-(ON) 250V/3A:
  • Flat diffuse Light Emitting Diodes (LED):
    • Green and red
  • Resistors:
    • 220Ω 0,5W
  • Non-slip self-adhesive pads:
    • You can buy them in any home goods store or on Amazon
  • USB cable:
    • USB-A to micro USB-B
Tools needed:

Standard equipment for soldering (soldering iron, tin, rosin and some wires (ideally silicone). Multimeter can be useful to check resistors, contacts and switches.

Filament:

PLA is fine. But you can use any filament you want. All non-flex materials will be ok. Regarding color, I am using black and white because it is color of my other computer accessories like keyboard, mouse and headphones. If you want color similar to Airbus or to famous Thrustmaster TCA hardware, you can use colorfabb blue/grey PLA filament or you can postproces with airbrush and RAL 5024 color.

Print settings:

You can print with any standard settings with supports. Only base should be printed without supports. But my recomendation is to use 100% infill to increase weight and stiffnes. It is not too much of material. It is just small box with knob.

Case should be printed on textured PEI powder-coated spring steel sheet to get nice texture on the top of the case. Rest can be printed on standard smooth spring steel sheet.

Knob with Airbus logo can be printed with hilbert curve and color change (2 parts), with color change (1 part) or without any special settings as one part.

You can use 3MF project files to slice with predefined settings. It is useful especially for the knob, so you dont have to set all settings manually, even if it is not complicated.

Wiring:

Please use high quality wires with silicon insulation because wires with plastic insulation will melt. Diameter 28AWG is fine. You can also use universal PCB for ground and LED wiring (you can see it on the pictures). But it is not necessary, everything can be wired with wires only. It is also possible to use DuPont pins on Arduino (there is enough space in the case) but you have to crimp connectors on to your wires. I am using them becuase it is easy to debug and develop new extensions (please see “Ideas and To Dos” section). For final product is ok to solder wires directly to the Arduino.

Wiring diagram:

Code:

Code was inspired by 2 similar projects from Github (links are in “Inspiration” section).

Ideas and To Dos:
  1. Add a sliding switch to the side to allow media control with knob (volume) and buttons (play/pause, mute).
  2. Add few side buttons to allow assign other functions for example like “TO check” or “MAX brake”.
  3. Cleanup the code. It is big mess right now.
FAQ & Tips:
  1. Arduino Pro Micro can be mounted with help of hot glue on the sides or with zip tie.
  2. Arduino Pro Micro with 3.3V/8MHz cant be used.
  3. Do not use clear or non-diffuse LEDs, they are too bright.
  4. If knob is too tight for your potentiometer, try increase size by few % and print again.
Tested and fully working with:
Inspiration:
LED demo:

Can’t log in to Windows 11 after installing CAB language packs

If you, like me, were used to installing the language pack for the windows operating system as part of the task sequence, whether using MDT or not, you must have been unpleasantly surprised that this simple procedure is no longer possible in Windows 11. I’m not sure when this change was made, but you still need to install the latest cumulative update of the operating system for the language pack to work properly.

Don’t get me wrong, the procedure is still the same, i.e. preparation of the Windows WIM file, preparation of the individual LP packages from the official Language Pack media downloaded from the VLSC portal, their subsequent integration in the TS using MDT and in my case subsequent modification of the variables used in our UIplusplus configuration, which we use as an interface in Windows PE, with which local administrators work and which is used to configure all the variables needed to customize the installation of the operating system in our company.

All of this worked absolutely great for Windows 10 20H2 deployment until recently. However, due to the approaching date of the end of Windows 10 support, we decided to prepare TS for Windows 11 as well.

But now, after successfully installing said Language Packs, there are multiple features in Windows that stop working (seems to depend on LP but typically start menu, login screen, task bar, search bar etc.). Those features remain broken until you install a later Cumulative Update. But it you want to use a recently patched ISO, say Octobers for example, then there isn’t a more recent LCU for you to use, so the only alternative is to use an older ISO (which may no longer be available to download) or wait until the LCU is released.

You can download LCU in .msu format from Microsoft Update Catalogue, then create package without the program and use Run Command Line step in TS to install LCU with wusa.exe. Install LCU step should happen after Apply Windows Settings and Setup Windows and ConfigMgr steps.

In my particular case, the bug was manifested by the user being unable to log in to the operating system. The login screen was practically unreachable, because after any swiping or pressing a key it simply and easily did not appear. You can see the behaviour of the login screen in the attached video: